
Irresistible Bite-Sized Healthy Twix Cups: Your Gluten-Free, Dairy-Free, Refined Sugar-Free Treat!
The moment our amazing community started transforming our beloved Healthy Twix Bars into adorable mini cups, we knew a new culinary chapter had begun. The ingenuity of the Good Eats fam knows no bounds, and this brilliant twist demanded a dedicated recipe. We’re thrilled to present our very own Bite-Sized Twix Cups – a true game-changer that promises to delight your taste buds!
Our original Healthy Twix Bars have consistently ranked as one of our most popular recipes, captivating countless enthusiasts with their wholesome goodness. Now, imagine all that irresistible flavor and texture, perfectly portioned into bite-sized morsels. It’s a revelation! A huge shoutout goes to @bripetrous for sparking the inspiration behind this miniature masterpiece. This recipe truly embodies the collective genius and passion that defines our Good Eats community!
Experience Big Twix Energy in Every Bite-Sized Cup
For those who follow our culinary adventures, you know our deep passion for re-imagining classic sweets, treats, and desserts using ingredients that are genuinely better for you. Our flagship Healthy Twix Bars quickly became a household favorite, a testament to the fact that wholesome ingredients can indeed deliver extraordinary flavor. But these new Bite-Sized Twix Cups? They elevate the experience to an entirely new level of brilliance.
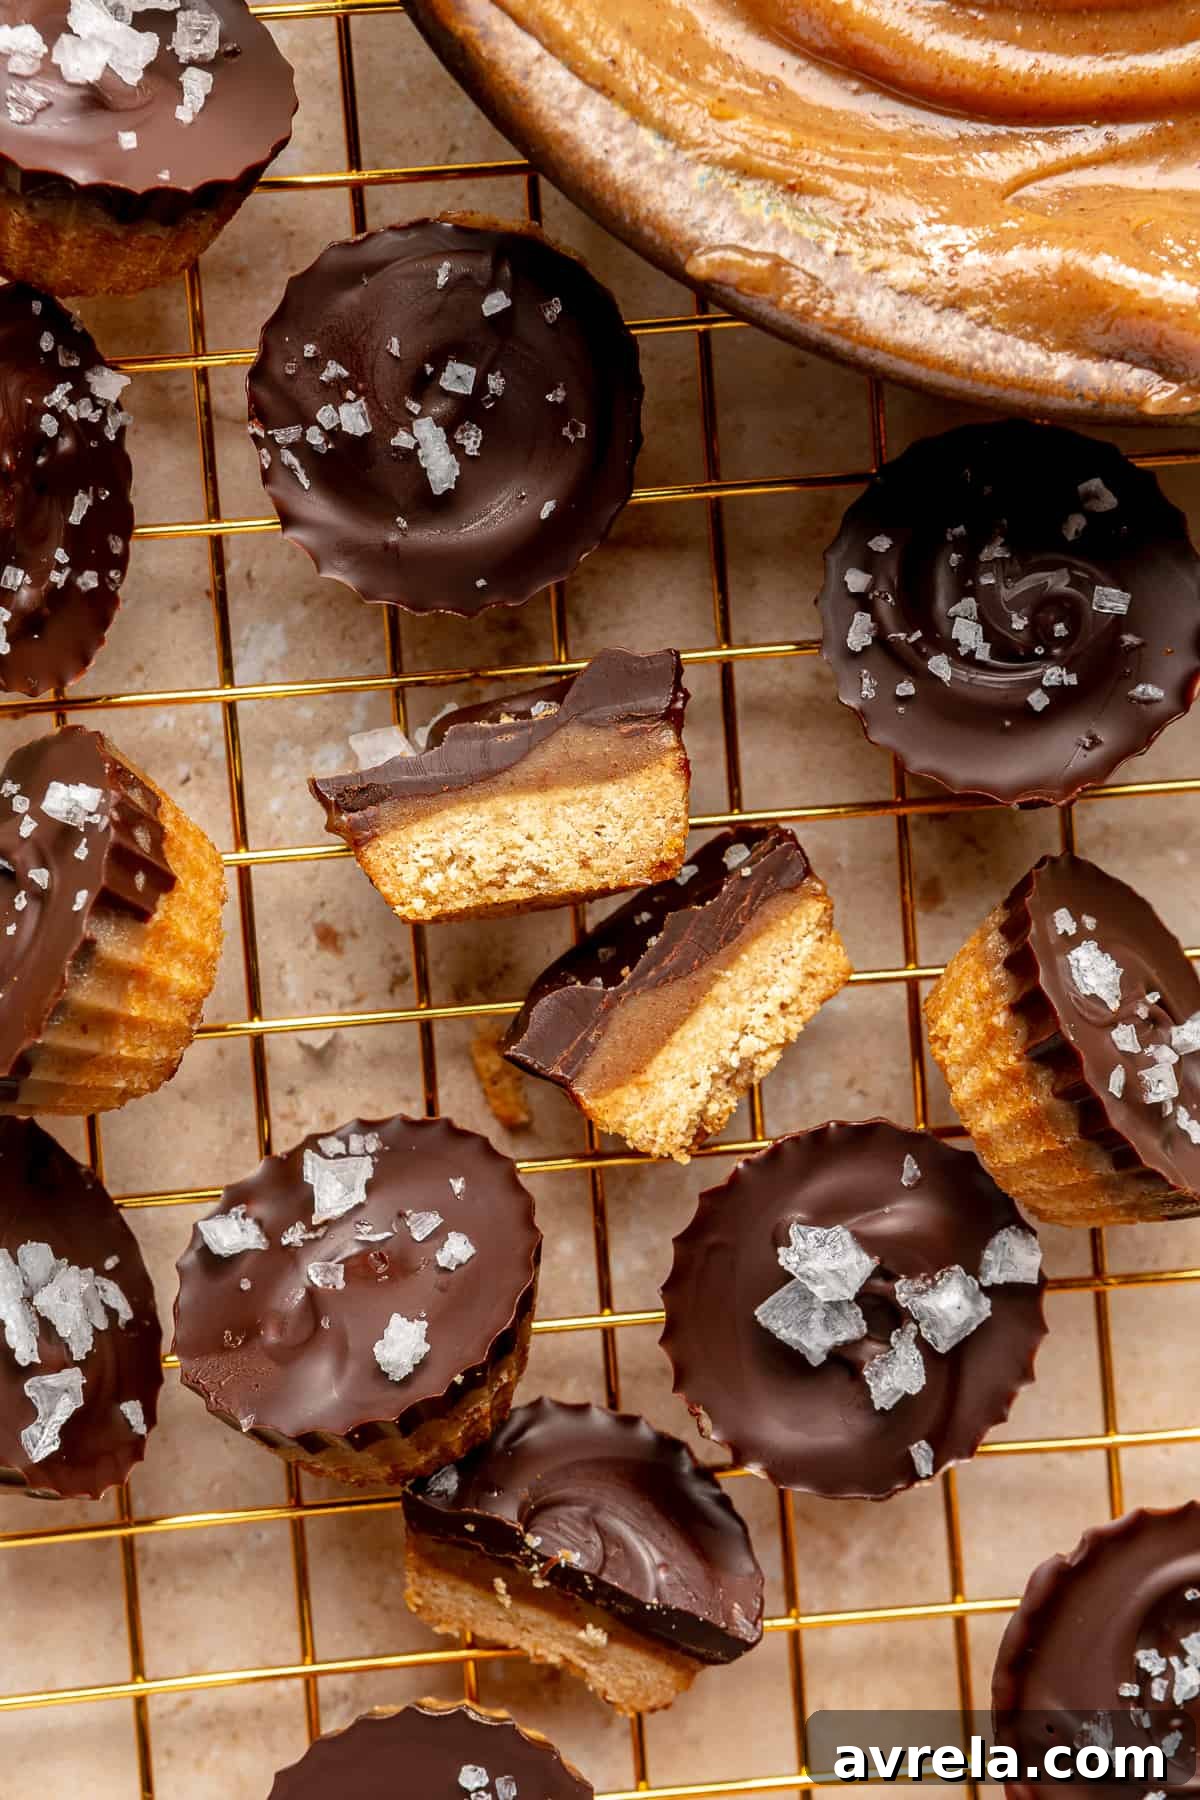
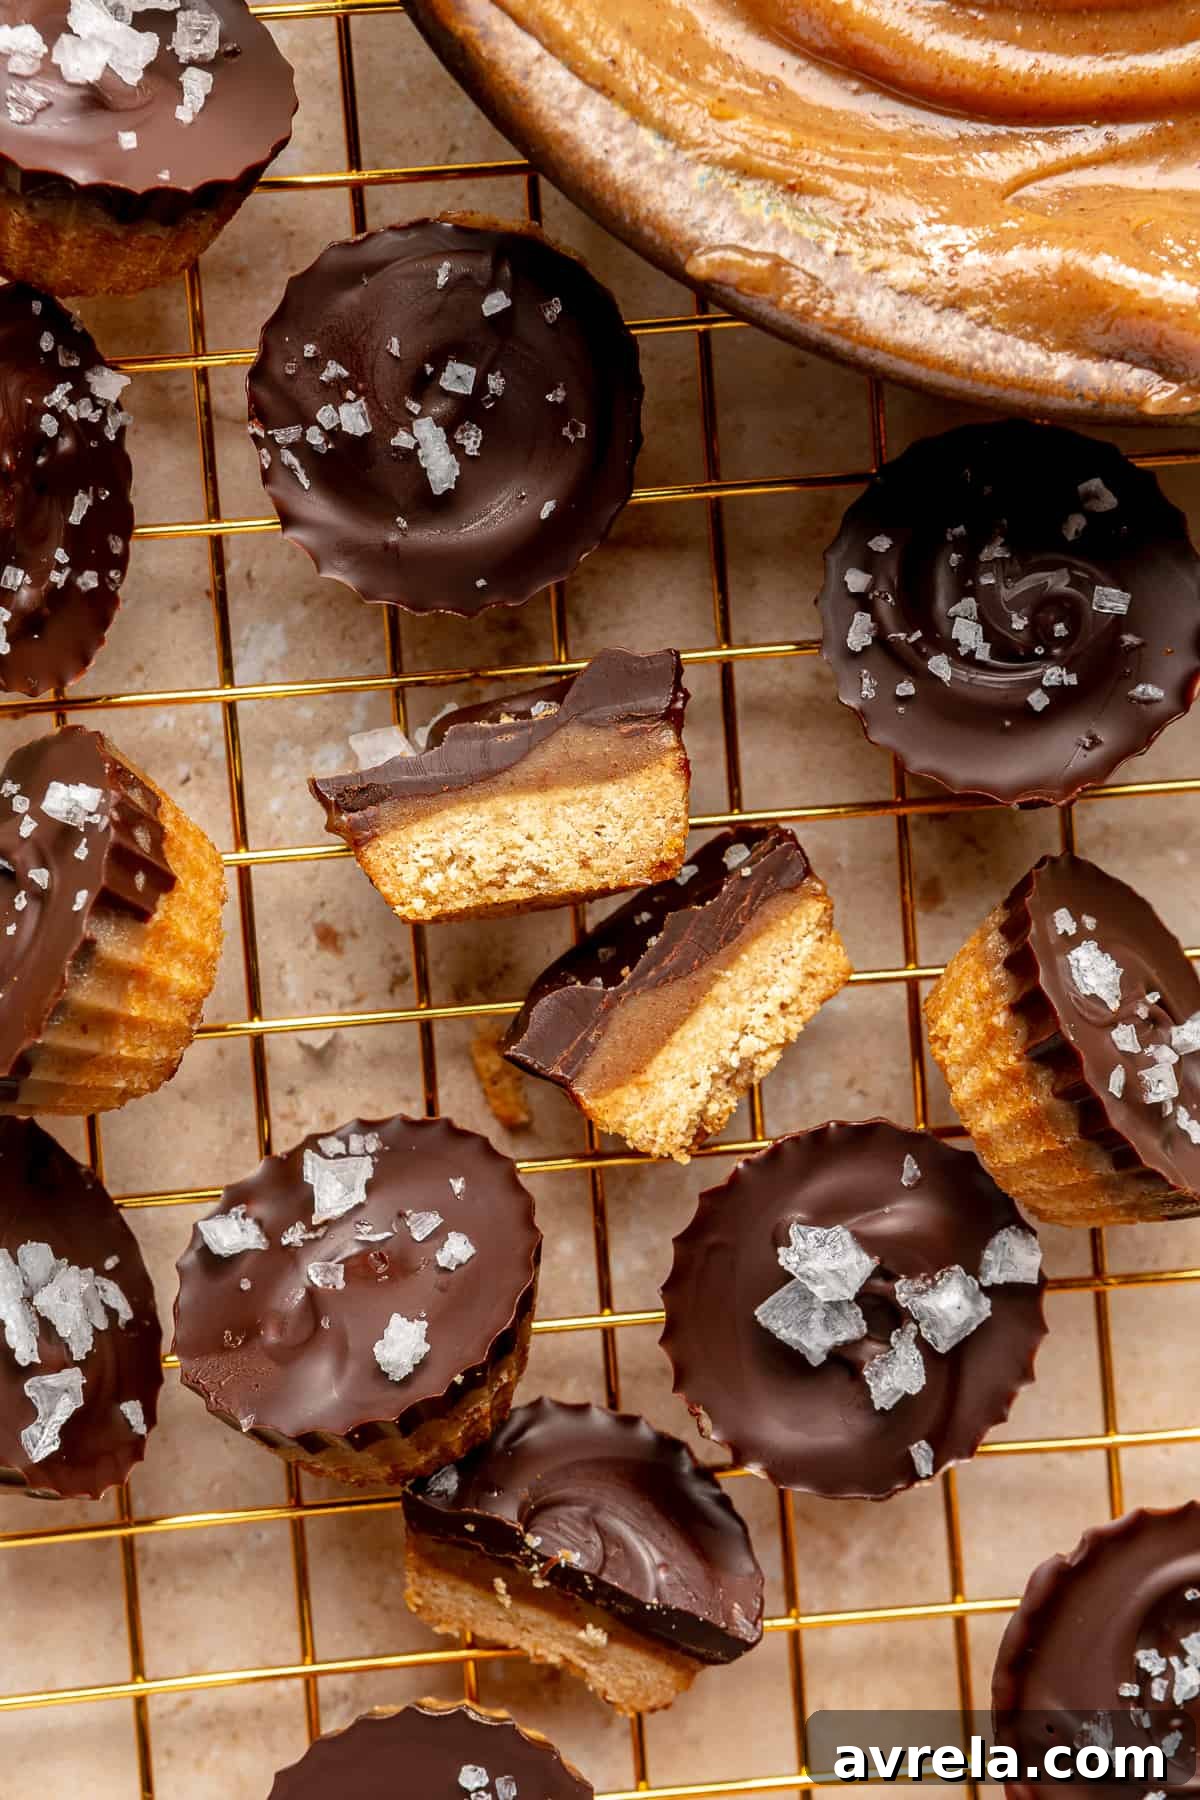
Just like their full-sized counterparts, these mini delights feature three distinct, mouth-watering layers: a perfectly crisp, buttery shortbread base, a rich and gooey caramel center, and a luxurious, velvety smooth chocolate coating. We dare you not to start drooling just thinking about it!
To truly complete the symphony of flavors, a delicate sprinkle of flaky sea salt on top adds that irresistible sweet and salty contrast. Compared to the conventionally packaged versions, these homemade Twix cups are not just equally delicious, they are arguably even more so. Each tiny cup delivers that undeniable “big Twix energy,” as Bridger eloquently put it, but in a perfectly portioned, incredibly satisfying bite.
The primary distinction between these adorable mini cups and our original Twix bars lies in the presentation. For these bite-sized wonders, we utilize a mini candy silicone mold (conveniently linked in our Amazon storefront), carefully layering each component within the individual mini cups.
The process is surprisingly straightforward, despite its impressive outcome. You simply bake the shortbread base for a brief period, allow it to cool completely, then introduce the luscious caramel layer, freezing it until firm. Finally, a decadent chocolate coating is applied, finished with that crucial touch of flaky sea salt – essential for that perfect balance of sweet and savory! Don’t let the three-step process intimidate you; we promise it’s incredibly easy to follow and the truly sensational results are beyond worth every moment of effort.
A Better-For-You Remake of a Classic Candy Bar
Did we mention that these incredible Bite-Sized Twix Cups are entirely gluten-free, dairy-free, and refined sugar-free? You might find that hard to believe the moment you pop one (or two, or three – absolutely no judgment here!) into your mouth. The rich flavors and satisfying textures are so authentic, you’d never guess they’re made with such wholesome ingredients.
Knowing that you’re indulging in a treat crafted with nutrient-dense and fiber-packed almond and coconut flours – ingredients known to help stabilize blood sugar – alongside natural sweeteners like honey and maple syrup, makes these Twix cups even more enjoyable. It’s a dessert you can feel genuinely good about, a concept we can all wholeheartedly embrace.
What’s not to adore about a healthier, perfectly portioned version of a classic candy bar we’ve all grown to love? The obsession with this recipe is undeniably real; in fact, the original Twix Bar recipe earned a very deserving spot in my first cookbook, Rachael’s Good Eats. These bite-sized variations are sure to achieve similar cult status!
Do yourself a delicious favor and satisfy your candy cravings with these homemade, Bite-Sized Twix Cups. We guarantee you’ll become utterly obsessed! And when you do make them, please let us know your thoughts and, more importantly, how long they last (we’re having a hard time resisting them ourselves, just like Bridger and I!).
Essential Ingredients for Your Bite-Sized Twix Cups
Crafting these delectable mini Twix cups requires a thoughtful selection of wholesome ingredients, ensuring every bite is both delicious and nourishing. Here’s what you’ll need for each layer:
Shortbread Layer
- Coconut flour: Provides a delicate texture and natural sweetness.
- Almond flour: Adds richness and helps create that classic shortbread crumbliness.
- Coconut oil, melted: Binds the ingredients and contributes to the signature “buttery” feel.
- Honey (or substitute maple syrup): A natural sweetener that keeps this recipe refined sugar-free.
Caramel Layer
- Almond butter, creamy or crunchy (or your favorite nut or seed butter): Forms the creamy base of our wholesome caramel.
- Coconut oil: Helps achieve that smooth, luscious caramel consistency.
- Vanilla extract: Enhances the overall flavor profile with its warm, aromatic notes.
- Maple syrup: Another natural sweetener that gives the caramel its classic rich taste.
- Sea salt: A crucial pinch to perfectly balance the sweetness and elevate the flavors.
Chocolate Layer
- Dark chocolate bar (we recommend @evolvedchocolate Signature Dark Chocolate Bar, or substitute chocolate chips): For a deep, rich chocolate coating that’s also dairy-free.
- Coconut oil: Ensures a smooth, glossy finish for your chocolate and aids in melting.
- Flaky sea salt: The final, essential touch for that irresistible sweet and savory harmony.
Other Essential Equipment
- Mini candy silicone mold (linked here and in my Amazon storefront): Key for achieving the perfect bite-sized cup shape.
- Mixing bowls
- Saucepans
Crafting Your Own Bite-Sized Healthy Twix Cups: A Step-by-Step Guide
Embark on this delightful journey to create your own healthier version of a classic candy bar. The process is divided into simple, manageable steps, ensuring a fun and rewarding baking experience.
The Crunchy Shortbread Layer
- Begin by preheating your oven to a temperate 350 degrees Fahrenheit (175°C). In a spacious mixing bowl, combine the coconut flour and almond flour. Add the melted coconut oil and the warmed honey (or maple syrup, if you prefer). Using a sturdy silicone spatula, gently fold and mix all the shortbread ingredients together. Ensure you stir thoroughly, breaking up any flour crumbles, until a uniform and well-combined mixture is achieved.
- With a small spoon, carefully fill approximately one-third of each cup in your mini silicone mold with the shortbread mixture. To transfer the mixture smoothly, use your finger to slide it off the spoon into each cup. Then, use the back of the spoon to gently but firmly pack the mixture down, creating an even and compact base. If you notice the shortbread mix beginning to stick to your spoon, simply dip the spoon into a little melted coconut oil before continuing to press, which will prevent sticking and allow for a smooth finish.
- Place the mold in the preheated oven and bake for about 8 minutes. Keep a close eye on the shortbread; it should turn a lovely golden brown at the edges. Once baked to perfection, remove the mold from the oven and set it aside on a wire rack to cool completely. This cooling step is crucial for the shortbread to firm up and maintain its structure.
The Smooth Caramel Layer
- In a medium-sized saucepan, combine your choice of almond butter (creamy or crunchy works wonderfully, or any favorite nut or seed butter), coconut oil, vanilla extract, maple syrup, and a delicate pinch of sea salt. Place the saucepan over medium-low heat. Gently heat the mixture, whisking continuously, until all the ingredients have fully liquified and are smoothly incorporated, which should take approximately 2-3 minutes. Once it reaches a perfect, pourable consistency, remove the saucepan from the burner and allow the caramel mixture to cool completely. This cooling step is important for the caramel to set properly.
The Velvety Chocolate Layer
- Break your chosen dark chocolate bar into small pieces (or use chocolate chips) and place them in a small, microwave-safe bowl. Add the coconut oil. Warm the chocolate mixture in the microwave in 30-second intervals, stirring thoroughly after each interval, until the chocolate is completely liquified and smooth. Alternatively, if you prefer a stove-top method, you can gently melt the chocolate and coconut oil in a double boiler or a small saucepan over very low heat, stirring constantly until smooth and glossy.
Assembling Your Bite-Sized Twix Cups
- Now, it’s time to bring all the delicious layers together! Once both the shortbread base and the caramel layer have cooled completely to room temperature, carefully pour the luscious caramel sauce over the shortbread in each mini cup. Spread the caramel out evenly, again filling approximately one-third of each mini cup. Immediately transfer the silicone mold to the freezer. Allow these two combined layers to harden completely, which typically takes about 1-2 hours. Ensuring they are fully frozen will prevent the layers from mixing when the chocolate is added.
- Once the caramel layer is completely frozen and firm (double-check that it’s not soft by gently pressing on it; if still soft, return to the freezer for a bit longer), remove the mold from the freezer. Pour the warm, melted chocolate evenly over the caramel layer in each cup, filling them to the top. This will form the final, decadent chocolate coating. While the chocolate is still wet, generously sprinkle flaky sea salt over the top of each cup – this is a critical step for that perfect sweet and salty balance. Finally, transfer the mold to the refrigerator for 5-10 minutes to allow the chocolate to harden and set.
- After everything has thoroughly chilled and set, carefully remove the hardened bite-sized cups from the silicone mold. They should easily pop out from the bottom with gentle pressure. You have the option to wrap each mini Twix cup individually in small foil or parchment paper candy wrappers, perfect for gifting or longer storage, or simply arrange them on a plate for immediate enjoyment. Indulge and savor every delightful bite!
Storing Your Homemade Twix Cups
- To maintain their freshness and perfect texture, these Bite-Sized Twix Cups are best stored in an airtight container. They will keep beautifully in the refrigerator for about one week, or you can extend their shelf life significantly by storing them in the freezer for up to one month. If you choose to freeze them, remember to let them sit at room temperature for a few minutes before serving. This brief thaw will allow the layers to soften slightly, bringing them to the ideal, enjoyable texture.
Recipe Substitutions & Common Questions
We believe in flexibility and catering to individual preferences in the kitchen. Here are some common substitutions and answers to frequently asked questions to help you tailor these Bite-Sized Twix Cups to your liking:
Flexible Ingredient Options
For the shortbread layer, feel absolutely free to swap maple syrup for honey; both yield delicious results. When it comes to the caramel layer, any creamy or crunchy nut or seed butter you prefer will work beautifully – almond, cashew, or even sunflower seed butter are great choices. For the chocolate layer, if a dark chocolate bar isn’t on hand, a simple 1/2 cup of your favorite chocolate chips can be used as a substitute. Additionally, if coconut oil isn’t preferred or available, melted butter or even a vegan butter alternative can be used in its place to achieve similar results. You truly have a wealth of options to customize this recipe!
No Mini Candy Mold? No Problem!
If you’re reading this and suddenly struck with an irresistible Twix bar craving but don’t possess a mini candy silicone mold, don’t despair! You can absolutely still enjoy this classic treat in a different form. We highly recommend trying our original Healthy Twix Bars or exploring the seasonal Pumpkin Twix Bar variation. Both of these fantastic recipes do not require any special silicone molds, allowing you to get your Twix fix with ease!
Is Homemade Candy Truly Better for You?
In many significant ways, yes, homemade candy often offers a healthier alternative compared to its store-bought counterparts. Our homemade versions, such as these delightful Bite-Sized Twix Cups, are intentionally crafted with more wholesome, better-for-you ingredients. This thoughtful approach generally results in desserts that contain less sugar, healthier fats, and fewer chemical additives. We also actively avoid inflammatory ingredients commonly found in commercial candies, such as highly processed seed or vegetable oils and refined sugars.
Even with these healthier modifications, it’s important to remember that any dessert or candy is fundamentally a treat. In our philosophy, treats are best enjoyed mindfully and in moderation. However, we also acknowledge that life calls for those moments when you simply need an extra pick-me-up, and indulging in a delicious, homemade treat made with love and better ingredients is perfectly fine and encouraged!
Is Adding Oil Necessary When Melting Chocolate?
This is a very common and excellent question, especially for homemade candy bar and dessert recipes that involve a chocolate coating. Our perspective on this is clear: while adding oil isn’t an absolute necessity for melting chocolate, it is a practice we strongly prefer and typically recommend. Adding a small amount of coconut oil to your chocolate, whether you’re melting it over the stove or in the microwave, offers several distinct benefits. The coconut oil imparts a beautiful, silky shine to the melted chocolate and significantly aids in achieving a smoother, more fluid consistency. This makes the chocolate perfectly ideal for dipping, drizzling, and coating your treats, ensuring an even and attractive finish. If coconut oil isn’t your preference, a small amount of butter can also achieve a similar smooth and glossy result.
Craving More? Discover Our Other Classic Candy Remakes & Sweet Treats!
If you’ve fallen in love with these Bite-Sized Twix Cups, prepare to be delighted by more of our healthier takes on classic confections and indulgent desserts. Explore these other fan favorites:
- Raw Mars Bars: A wholesome twist on a beloved candy.
- 5-Ingredient Date Snickers: Incredible flavor with minimal ingredients.
- Chocolate Tahini Cookie Skillet: A warm, gooey dessert perfect for sharing.
- Copycat Reese’s Peanut Butter Cups: Your favorite peanut butter and chocolate combo, made better.
- Fudge Brownies (Gluten-free, Dairy-Free): Rich, decadent, and guilt-free.
- Homemade Nutter Butters (GF, DF, Refined Sugar-Free): A nostalgic treat, elevated.
Click here to watch the reel I made of this recipe!
Bite-Sized Twix Cups
Rachael DeVaux
3 hours
30
mini Twix cups
Total Time includes approximate setting times in the freezer and fridge.
Equipment
-
mini candy silicone mold (linked above + in my Amazon Storefront)
-
Mixing bowls
-
Saucepans
Ingredients
Shortbread Layer
-
1/2
cup
coconut flour -
1/2
cup
almond flour -
1/3
cup
coconut oil,
melted -
3
tablespoons
honey,
warmed (or sub maple syrup)
Caramel Layer
-
1/2
cup
almond butter,
creamy or crunchy (or your favorite nut or seed butter) -
1/4
cup
coconut oil -
1
teaspoon
vanilla extract -
1/4
cup
maple syrup -
Pinch
sea salt
Chocolate Layer
-
One
2.5 oz dark chocolate bar,
I use Evolved Chocolate Signature Dark Chocolate Bar, or sub 1/2 cup chocolate chips -
1
tablespoon
coconut oil -
1/4
teaspoon
flakey sea salt
Instructions
Shortbread Layer
-
Preheat the oven to 350 degrees Fahrenheit. In a large bowl, combine the coconut + almond flours with melted coconut oil and warmed honey (or maple syrup). Use a silicone spatula to mix all of the shortbread ingredients together, making sure to stir out all of the crumbles of flours until thoroughly combined.
-
Using a small spoon, fill about 1/3 of each cup in the mini silicone mold with the shortbread mixture. Use your finger to slide the mixture off the spoon into each cup, and the back of the spoon to gently pack it down. If you find the shortbread mix starts to stick to your spoon, simply dip the spoon into melted coconut oil and continue to gently press down evenly into the base of each mini cup.
-
Bake for about 8 minutes, or until the shortbread starts to turn golden brown. Remove from oven once done, and set aside to cool completely.
Caramel Layer
-
In a medium-sized saucepan, combine the almond butter (or nut or seed butter of choice), coconut oil, vanilla, maple syrup and sea salt over medium-low heat. Heat until completely liquified, whisking together, for about 2-3 minutes. Remove from the burner and let the mixture cool completely.
Chocolate Layer
-
Break up your chocolate bar of choice (or chocolate chips) into a small bowl and add coconut oil. Warm in the microwave for 30 second intervals, stirring in between, until completely liquified. You could also heat the chocolate and coconut oil over the stove, if preferred.
Bite-Sized Twix Cups
-
Now it’s time to put it all together. Once the shortbread and caramel layers have completely cooled, pour the caramel sauce over the shortbread base layer, spreading it out evenly, again filling about 1/3 of each mini cup. Set in the freezer until these two combined layers completely harden (about 1-2 hours).
-
Once frozen, remove from the freezer (be sure to put back into the freezer to finish hardening if you find it’s still soft), and pour the melted chocolate over top to fill each cup in the silicone mold – again, spreading out evenly. Sprinkle flakey sea salt as the final touch and set in the fridge for 5-10 minutes to harden.
-
After everything has chilled together, remove the hardened bite-sized cups from the silicone mold by carefully popping them out from the bottom (they should pop out easily). Option to wrap individually in mini foil or parchment paper candy wrappers, or serve on a plate. Enjoy!
To Store
-
Store in an airtight container in the refrigerator for about one week and the freezer for about one month. If kept in the freezer, make sure to leave them out at room temp for a few minutes before serving so they soften up a bit.