
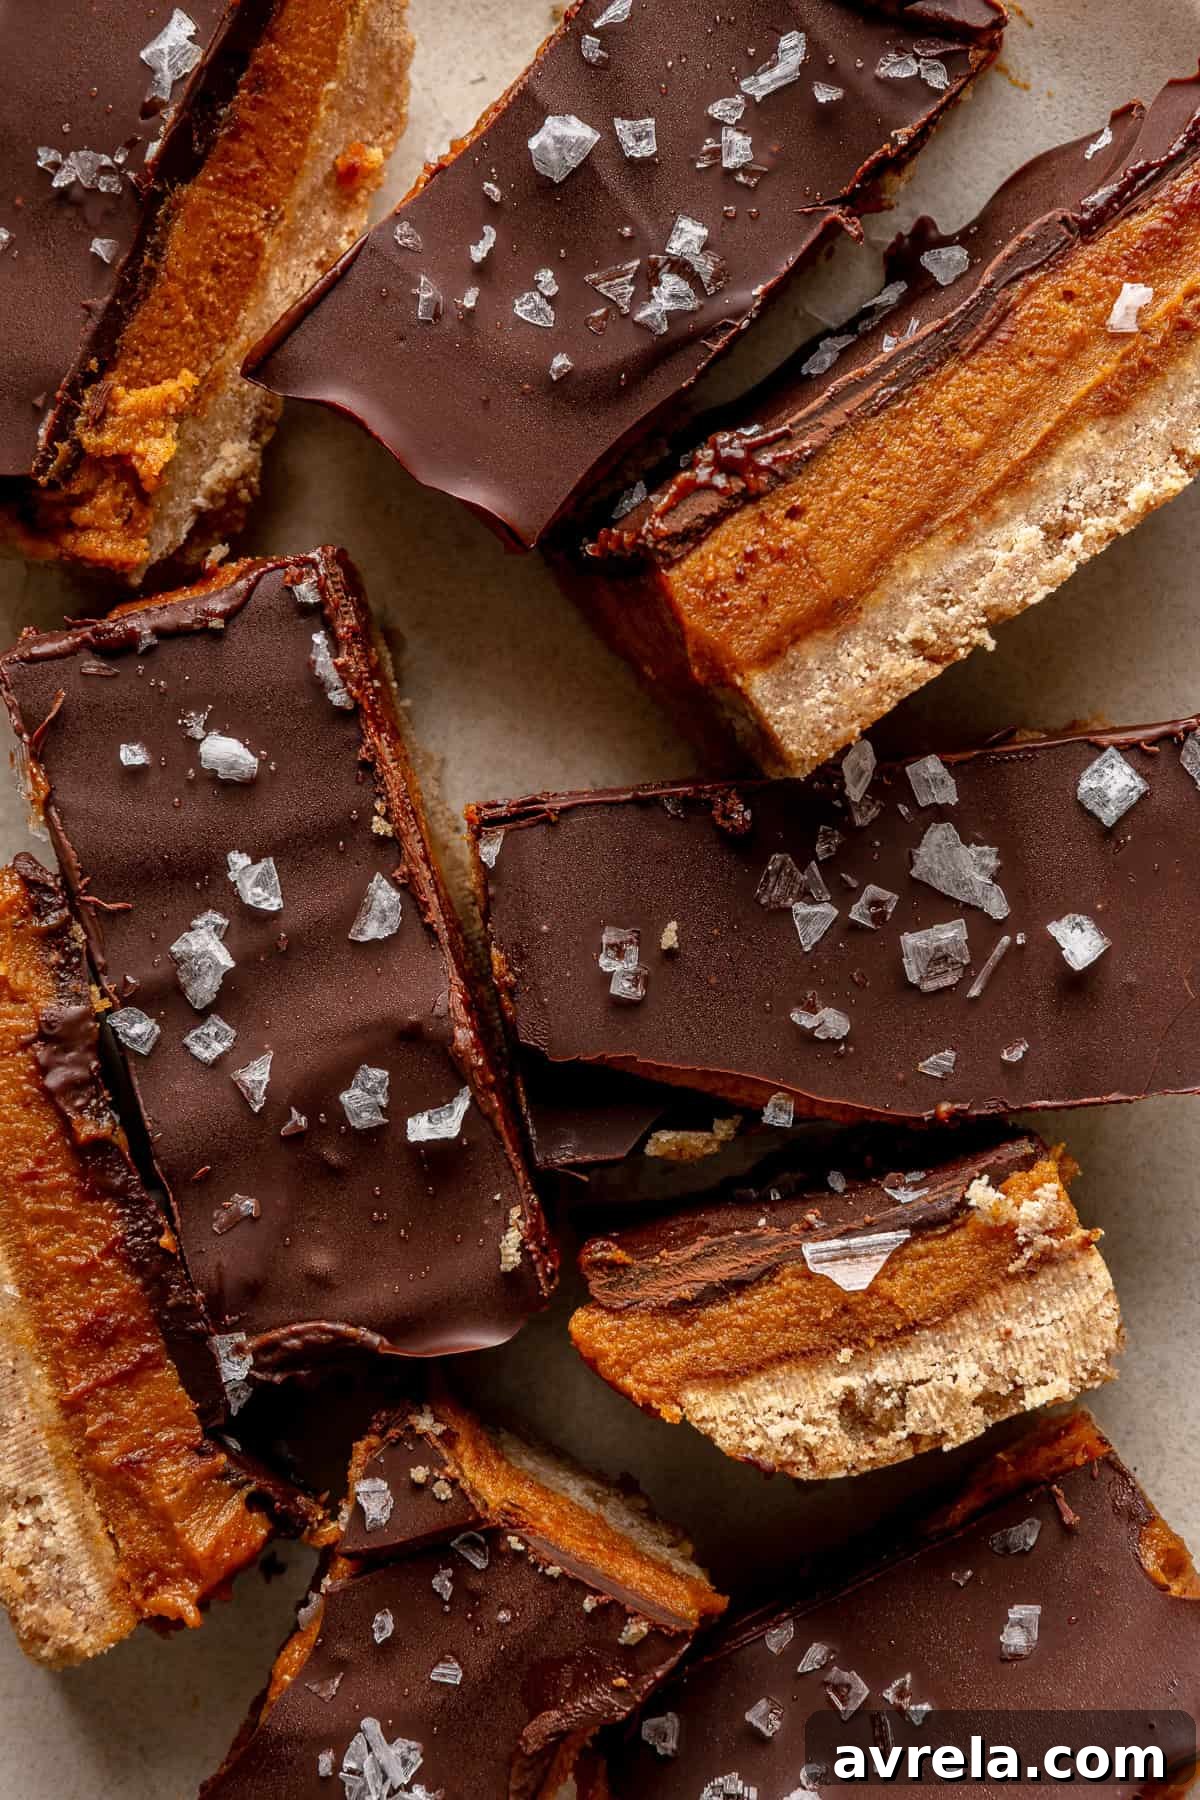
Indulge Guilt-Free This Fall: Irresistible Healthy Pumpkin Twix Bars (Gluten-Free & Dairy-Free!)
As the leaves begin to turn and a crispness fills the air, there’s nothing quite like the comforting embrace of fall flavors. And what better way to celebrate the season than with a delightful treat that captures all the cozy essence of autumn? We’re taking a beloved classic – the iconic Twix bar – and giving it a spectacular seasonal makeover with these incredibly delicious Pumpkin Twix Bars. Forget processed candies; these homemade delights are not just bursting with authentic pumpkin spice flavor, but they’re also crafted with your well-being in mind. Prepare to make these on repeat and become the star of every fall gathering, from cozy family nights to festive holiday feasts.
This recipe builds on the foundation of our wildly popular classic Healthy Twix Bars, infusing them with the warm, aromatic notes of pumpkin spice and the creamy richness of pumpkin purée. The result? A dessert that perfectly encapsulates the spirit of fall. What makes them truly stand out is their commitment to wholesome ingredients, making them entirely gluten-free, dairy-free, and free from refined sugars. Yes, you read that right – you can enjoy all the decadent layers of a traditional Twix bar without any of the guilt!
The Magic Behind the Wholesome Indulgence: Why These Bars Are Better
If the idea of a “healthy,” gluten-free, and dairy-free treat makes you a little skeptical, I completely understand. But I promise you, these Pumpkin Twix Bars will shatter any preconceived notions you have. One bite, and you’ll be convinced they’re not just “good for healthy bars,” but genuinely incredible – arguably even better than their processed, sugar-laden counterparts found in the candy aisle. This isn’t just a simple swap; it’s a culinary transformation that delivers on taste, texture, and nutritional value.
The secret lies in thoughtfully selected, real food ingredients. Imagine a perfectly crunchy shortbread base, a luxuriously sweet and smooth pumpkin caramel layer, and a rich, velvety chocolate coating – all harmoniously brought together, using components you can feel good about. It’s an indulgence that nourishes, thanks to ingredients like nutrient and fiber-packed almond and coconut flours, which not only contribute to the delightful texture but also help promote blood sugar stabilization. We sweeten these bars naturally with wholesome alternatives like honey and pure maple syrup, steering clear of refined sugars that can cause energy crashes.
As a registered dietitian, certified personal trainer, and busy new mom, my passion has always been to create and recreate classic sweet treats and desserts with a healthy, feel-good twist. These Pumpkin Twix Bars are a prime example of that philosophy in action. It’s about proving that you truly *can* have your cake and eat it too – enjoying decadent flavors without compromising your health goals. My mission is to empower you to indulge wisely, and this recipe is a testament to that commitment. If you love this concept, be sure to also check out my original Healthy Twix Bars or the delightful Bite-Sized Twix Cups – equally delicious and crafted with the same healthy principles.
Essential Ingredients for Your Healthy Pumpkin Twix Bars
Crafting these irresistible Pumpkin Twix Bars requires a thoughtful selection of wholesome ingredients, each playing a crucial role in creating the perfect texture and flavor for every layer. Here’s a breakdown of what you’ll need to gather:
For the Perfectly Crunchy Shortbread Layer:
- Coconut Flour: A fantastic gluten-free alternative that adds a subtle sweetness and a tender crumb, while also being high in fiber.
- Almond Flour: Provides a rich, nutty flavor and contributes to the shortbread’s delightful crispness. It’s also packed with healthy fats and protein.
- Melted Coconut Oil: Binds the shortbread ingredients together and ensures a buttery texture without dairy.
- Honey (or Maple Syrup): A natural sweetener that offers a warm, subtle flavor. Feel free to use whichever you prefer!
- Pumpkin Spice: The key to infusing that quintessential fall aroma and taste into your shortbread.
For the Smooth & Creamy Pumpkin Caramel Layer:
- Pumpkin Purée: The star of this seasonal caramel, lending its earthy sweetness and beautiful orange hue. Make sure it’s 100% pumpkin, not pumpkin pie filling.
- Almond Butter (or your favorite Nut/Seed Butter): Creates the base for our caramel, providing richness and a creamy texture. Cashew butter or sunflower seed butter also work wonderfully.
- Coconut Oil: Helps achieve the luscious, pourable consistency of traditional caramel.
- Maple Syrup: Adds a deep, complex sweetness that pairs perfectly with pumpkin.
- Vanilla Extract: Enhances all the other flavors, adding a touch of classic sweetness.
- Pumpkin Spice: Doubling down on the fall flavor, ensuring the caramel layer is just as aromatic as the shortbread.
- Pinch of Sea Salt: A crucial ingredient that balances the sweetness and elevates the overall flavor profile of the caramel.
For the Velvety Chocolate Coating:
- Chocolate Chips (or Dark Chocolate Bar): Opt for high-quality dark chocolate for the best flavor and fewer added sugars. Brands like Evolved Chocolate are excellent choices for their wholesome ingredients.
- Coconut Oil: Helps melt the chocolate smoothly, giving it a glossy finish and a perfect consistency for coating.
- Flaky Sea Salt: A sprinkle on top is optional but highly recommended. It provides a delightful contrast to the sweet chocolate and pumpkin, enhancing the overall experience.
Step-by-Step Guide to Crafting Your Irresistible Pumpkin Twix Bars
Making these healthy Pumpkin Twix Bars is a fun and rewarding process. Follow these detailed instructions to create each perfect layer:
1. The Golden Shortbread Layer:
- Preheat Your Oven: Start by preheating your oven to 350 degrees F (175 degrees C). This ensures your shortbread bakes evenly.
- Combine Ingredients: In a large mixing bowl, thoroughly combine all the shortbread ingredients. Stir vigorously until the mixture is well integrated and all crumbles are smoothly incorporated. The goal is a uniform, slightly damp dough.
- Prepare Baking Dish: Line a 6×6-inch baking dish with parchment paper, allowing some overhang on the sides – this will make it easy to lift out the finished bars later. If you only have an 8×8-inch dish, you can make it smaller by crumpling foil to fill the extra space on two sides, creating a snug 6×6 area.
- Press the Shortbread: Transfer the shortbread mixture into the prepared baking dish. Using a silicone spatula or the back of a spoon, press the mixture down firmly and evenly across the bottom of the pan. This creates a dense, sturdy base.
- Bake to Perfection: Bake for 10-12 minutes, or until the edges just begin to turn a light golden brown. Keep a close eye on it to prevent over-baking. Once baked, remove from the oven and set aside to cool completely. Cooling is crucial before adding the next layer.
2. The Decadent Pumpkin Caramel Layer:
- Prepare the Caramel: In a medium saucepan, combine all the caramel ingredients over medium-low heat.
- Whisk Until Smooth: Whisk continuously for about 2-3 minutes, or until the mixture becomes completely liquid and thoroughly combined into a smooth, creamy caramel. Avoid high heat to prevent burning.
- Cool the Caramel: Remove the saucepan from the heat and allow the caramel to cool slightly. It should still be pourable but not scorching hot.
3. The Silky Chocolate Layer:
- Melt the Chocolate: In a small saucepan over very low heat, combine your chosen chocolate chips or chopped dark chocolate bar with the coconut oil and a pinch of sea salt. Stir constantly until the chocolate is entirely liquid and smooth. Alternatively, you can melt the chocolate in the microwave in 30-second intervals, stirring well between each, until fully melted and glossy.
4. Assembling Your Pumpkin Twix Bars:
- Add the Caramel: Once both the shortbread and caramel layers have cooled completely, pour the caramel evenly over the baked shortbread base. Spread it gently with a spatula to cover the entire surface.
- Harden the Caramel: Place the baking dish into the freezer and let it chill until the caramel layer is completely firm, typically about 1-2 hours. This step is crucial for clean layers.
- Pour the Chocolate: Once the caramel is frozen solid, remove the dish from the freezer. Immediately pour the melted chocolate over the hardened caramel, spreading it quickly and evenly. The cold base will cause the chocolate to set very fast, so work efficiently!
- Garnish and Set: Sprinkle flaky sea salt over the wet chocolate layer for an added gourmet touch. Return the bars to the freezer for a final chill of 5-10 minutes. Important Note: Avoid leaving them in the freezer for too long at this stage, as excessively cold chocolate can sometimes crack when you attempt to slice the bars.
- Slice and Serve: Once the chocolate has hardened but isn’t overly brittle, carefully lift the entire slab of Twix bars out of the pan using the parchment paper overhang. Place it on a sturdy cutting board. Slice the slab into ½-inch strips, then cut these strips in half lengthwise for traditional bar shapes, or into thirds for delightful bite-sized pieces. Serve immediately and enjoy the fruits of your labor!
5. Storage Instructions:
To keep your Pumpkin Twix Bars fresh and delicious, store them in an airtight container:
- Refrigerator: They will last for up to 1 week in the refrigerator.
- Freezer: For longer storage, freeze them for up to 1 month. If serving from the freezer, allow them to sit at room temperature for a few minutes before indulging to soften slightly and enhance their texture.
Recipe Substitutions & Common Questions for Your Pumpkin Twix Bars
Part of the beauty of homemade recipes is the flexibility they offer! Don’t hesitate to customize these Pumpkin Twix Bars to suit your dietary needs or personal preferences. Here are some common questions and substitution ideas:
Can I make substitutions for the sweeteners?
Absolutely! In the shortbread layer, feel free to swap maple syrup for honey. Both provide natural sweetness and contribute to the texture beautifully. For the caramel layer, while maple syrup is recommended for its depth of flavor with pumpkin, a good quality date syrup could also work for a different caramel note, though the consistency might vary slightly.
What kind of nut or seed butter can I use in the caramel?
You have plenty of options! While almond butter is suggested, you can use any nut or seed butter you prefer. Creamy cashew butter will yield a very smooth caramel, while peanut butter would add a distinct flavor (although it might compete with the pumpkin spice a bit). For a nut-free version, sunflower seed butter is an excellent choice. Just ensure it’s a natural, unsweetened variety for the best results.
What are my options for the chocolate layer?
Instead of a dark chocolate bar, you can certainly use ½ cup of chocolate chips. When choosing chocolate, aim for dark chocolate (70% cocoa or higher) for a richer flavor and lower sugar content. If you’re strictly dairy-free, always double-check the ingredient list to ensure there’s no hidden dairy. Brands like Evolved Chocolate are known for their dairy-free options.
Can I use butter instead of coconut oil?
Yes, for those who are not dairy-free, melted butter can be used instead of coconut oil in all three layers (shortbread, caramel, and chocolate). If you need a vegan option, a good quality vegan butter substitute will also work seamlessly.
What if I don’t like pumpkin?
If you’re reading this and craving a healthy Twix bar but aren’t a fan of pumpkin, don’t worry – I’ve got you covered! Definitely give my original Healthy Twix Bars or the adorable Bite-Sized Twix Cups a try. They offer the same wholesome indulgence without the pumpkin, and I promise you’ll love them!
Do you have to add oil when melting chocolate?
This is a frequent query for homemade candy bar and dessert recipes involving melted chocolate. While not an absolute necessity, I highly recommend adding a small amount of coconut oil (or butter/vegan butter). It imparts a beautiful, silky shine to the chocolate, helps it melt more smoothly, and ensures a perfect, pliable consistency for dipping, drizzling, or coating. This little trick makes a big difference in the final look and feel of your bars.
Is homemade candy really better for you?
In many significant ways, yes, homemade candy is generally superior to its store-bought counterparts from a health perspective. When you make treats like these Pumpkin Twix Bars at home, you have complete control over the ingredients. This typically means:
- Fewer Refined Sugars: We use natural sweeteners, avoiding high-fructose corn syrup and excessive amounts of white sugar.
- Wholesome Fats: Ingredients like coconut oil and nut butters provide healthy fats, unlike the often inflammatory seed or vegetable oils found in commercial candies.
- Increased Nutrients and Fiber: Almond and coconut flours add beneficial fiber and nutrients that are completely absent in most processed snacks.
- No Artificial Additives: You avoid artificial flavors, colors, preservatives, and other chemicals commonly found in packaged goods.
Even with wholesome ingredients, any dessert or candy is still a treat best enjoyed in moderation. However, having a homemade, nutrient-conscious option allows for truly guilt-free indulgence when those sweet cravings hit. It’s about making conscious choices that support your overall well-being!
Looking for More Wholesome Sweet Treats? Try These:
If you’re loving the idea of healthy, homemade desserts, you’re in the right place! Explore some of my other popular recipes:
- Refreshing Peppermint Patties
- Nutrient-Packed Superfood Oatmeal Cookies
- Wholesome Copycat Reese’s Peanut Butter Cups
- Decadent Double Chocolate Zucchini Blender Bread
- Energizing High-Protein Banana Pudding
- Irresistible Raw Mars Bars
Want to see these bars come to life? Click here to watch the recipe reel I made!
Pumpkin Twix Bars
By Rachael DeVaux
Yields: Approximately 16 bars
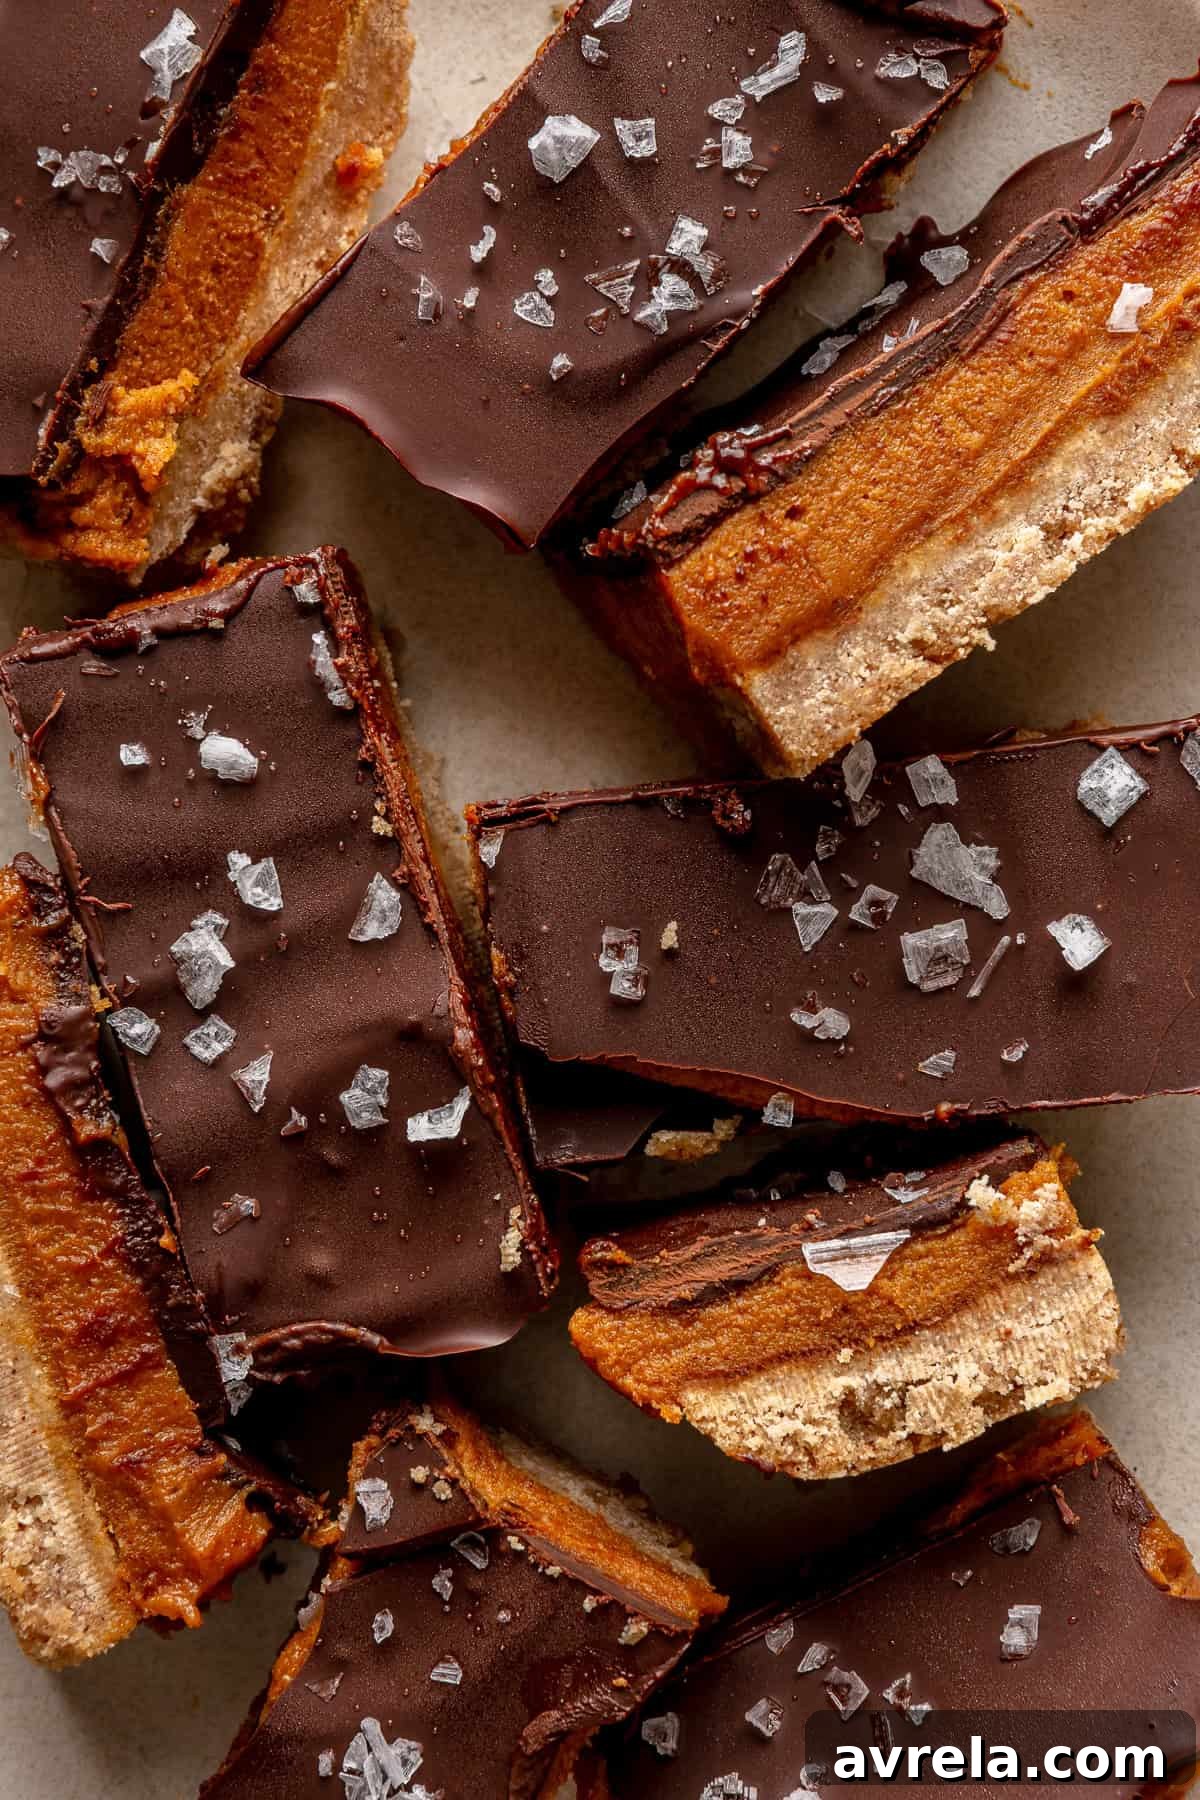
Putting a seasonal spin on my classic Healthy Twix Bars with these insanely delicious Pumpkin Twix Bars. I guarantee you’ll want to make them on repeat and bring to every fall holiday gathering. Gluten-free, dairy-free, and refined sugar-free, too!
Equipment You’ll Need:
- Large mixing bowl
- 6×6 inch baking dish (or an 8×8 inch dish with foil to size down)
- Small saucepan
- Medium saucepan
- Silicone spatula
- Parchment paper
Ingredients:
Shortbread Layer:
- 1/2 cup coconut flour
- 1/2 cup almond flour
- 1/3 cup coconut oil, melted
- 3 tablespoons honey, warmed (option to substitute maple syrup)
- 1 teaspoon pumpkin spice
Caramel Layer:
- 1/2 cup pumpkin purée
- 1/3 cup almond butter (or your favorite nut or seed butter)
- 1/4 cup coconut oil
- 1/4 cup maple syrup
- 1 teaspoon vanilla extract
- 1/2 teaspoon pumpkin spice
- Pinch of sea salt
Chocolate Layer:
- 1/2 cup chocolate chips (or one 2.5 oz dark chocolate bar, like Evolved Chocolate)
- 1 tablespoon coconut oil
- 1/4 teaspoon flaky sea salt
Instructions:
Shortbread Layer:
- Preheat the oven to 350 degrees F (175°C).
- In a large bowl, combine the shortbread ingredients until well combined, stirring out all crumbles to form a uniform dough.
- Line a 6×6 inch baking dish (or an 8×8 inch dish, using crumbled foil to reduce the size) with parchment paper. Firmly pack the shortbread mixture into the baking dish using a silicone spatula.
- Bake for 10-12 minutes or until just starting to turn golden brown. Remove from oven and let cool completely.
Caramel Layer:
- In a medium saucepan over medium-low heat, combine all the caramel ingredients.
- Whisk until the mixture is completely liquid and thoroughly mixed, about 2-3 minutes.
- Remove from the burner and let cool slightly.
Chocolate Layer:
- In a small saucepan over low heat, combine the chocolate, coconut oil, and sea salt. Stir constantly until the chocolate is completely liquid and smooth. (Alternatively, microwave in 30-second intervals, stirring in between, until melted.)
Assembling Your Twix Bars:
- Once the shortbread and caramel layers have cooled completely, pour the caramel over the shortbread, spreading it out evenly.
- Place the dish in the freezer until the caramel hardens completely, approximately 1-2 hours.
- Remove from the freezer. Pour the melted chocolate over the top, spreading it out evenly and quickly, as the cold base will cause it to set fast.
- Sprinkle flaky sea salt over the chocolate. Return to the freezer for 5-10 minutes to harden the chocolate. Note: Do not leave in the freezer for too long, as the chocolate may crack when slicing if it becomes too brittle.
- Once chilled and the chocolate has hardened, carefully lift the uncut Twix bars out of the pan by pulling up the parchment paper. Lay on a cutting board, and slice into ½-inch strips. Then, cut these strips in half lengthwise for bars, or into thirds for bite-sized pieces. Enjoy!
To Store:
- Store in an airtight container in the refrigerator for about 1 week or in the freezer for about 1 month.
- If kept in the freezer, let them sit out at room temperature for a few minutes before serving to soften slightly.