
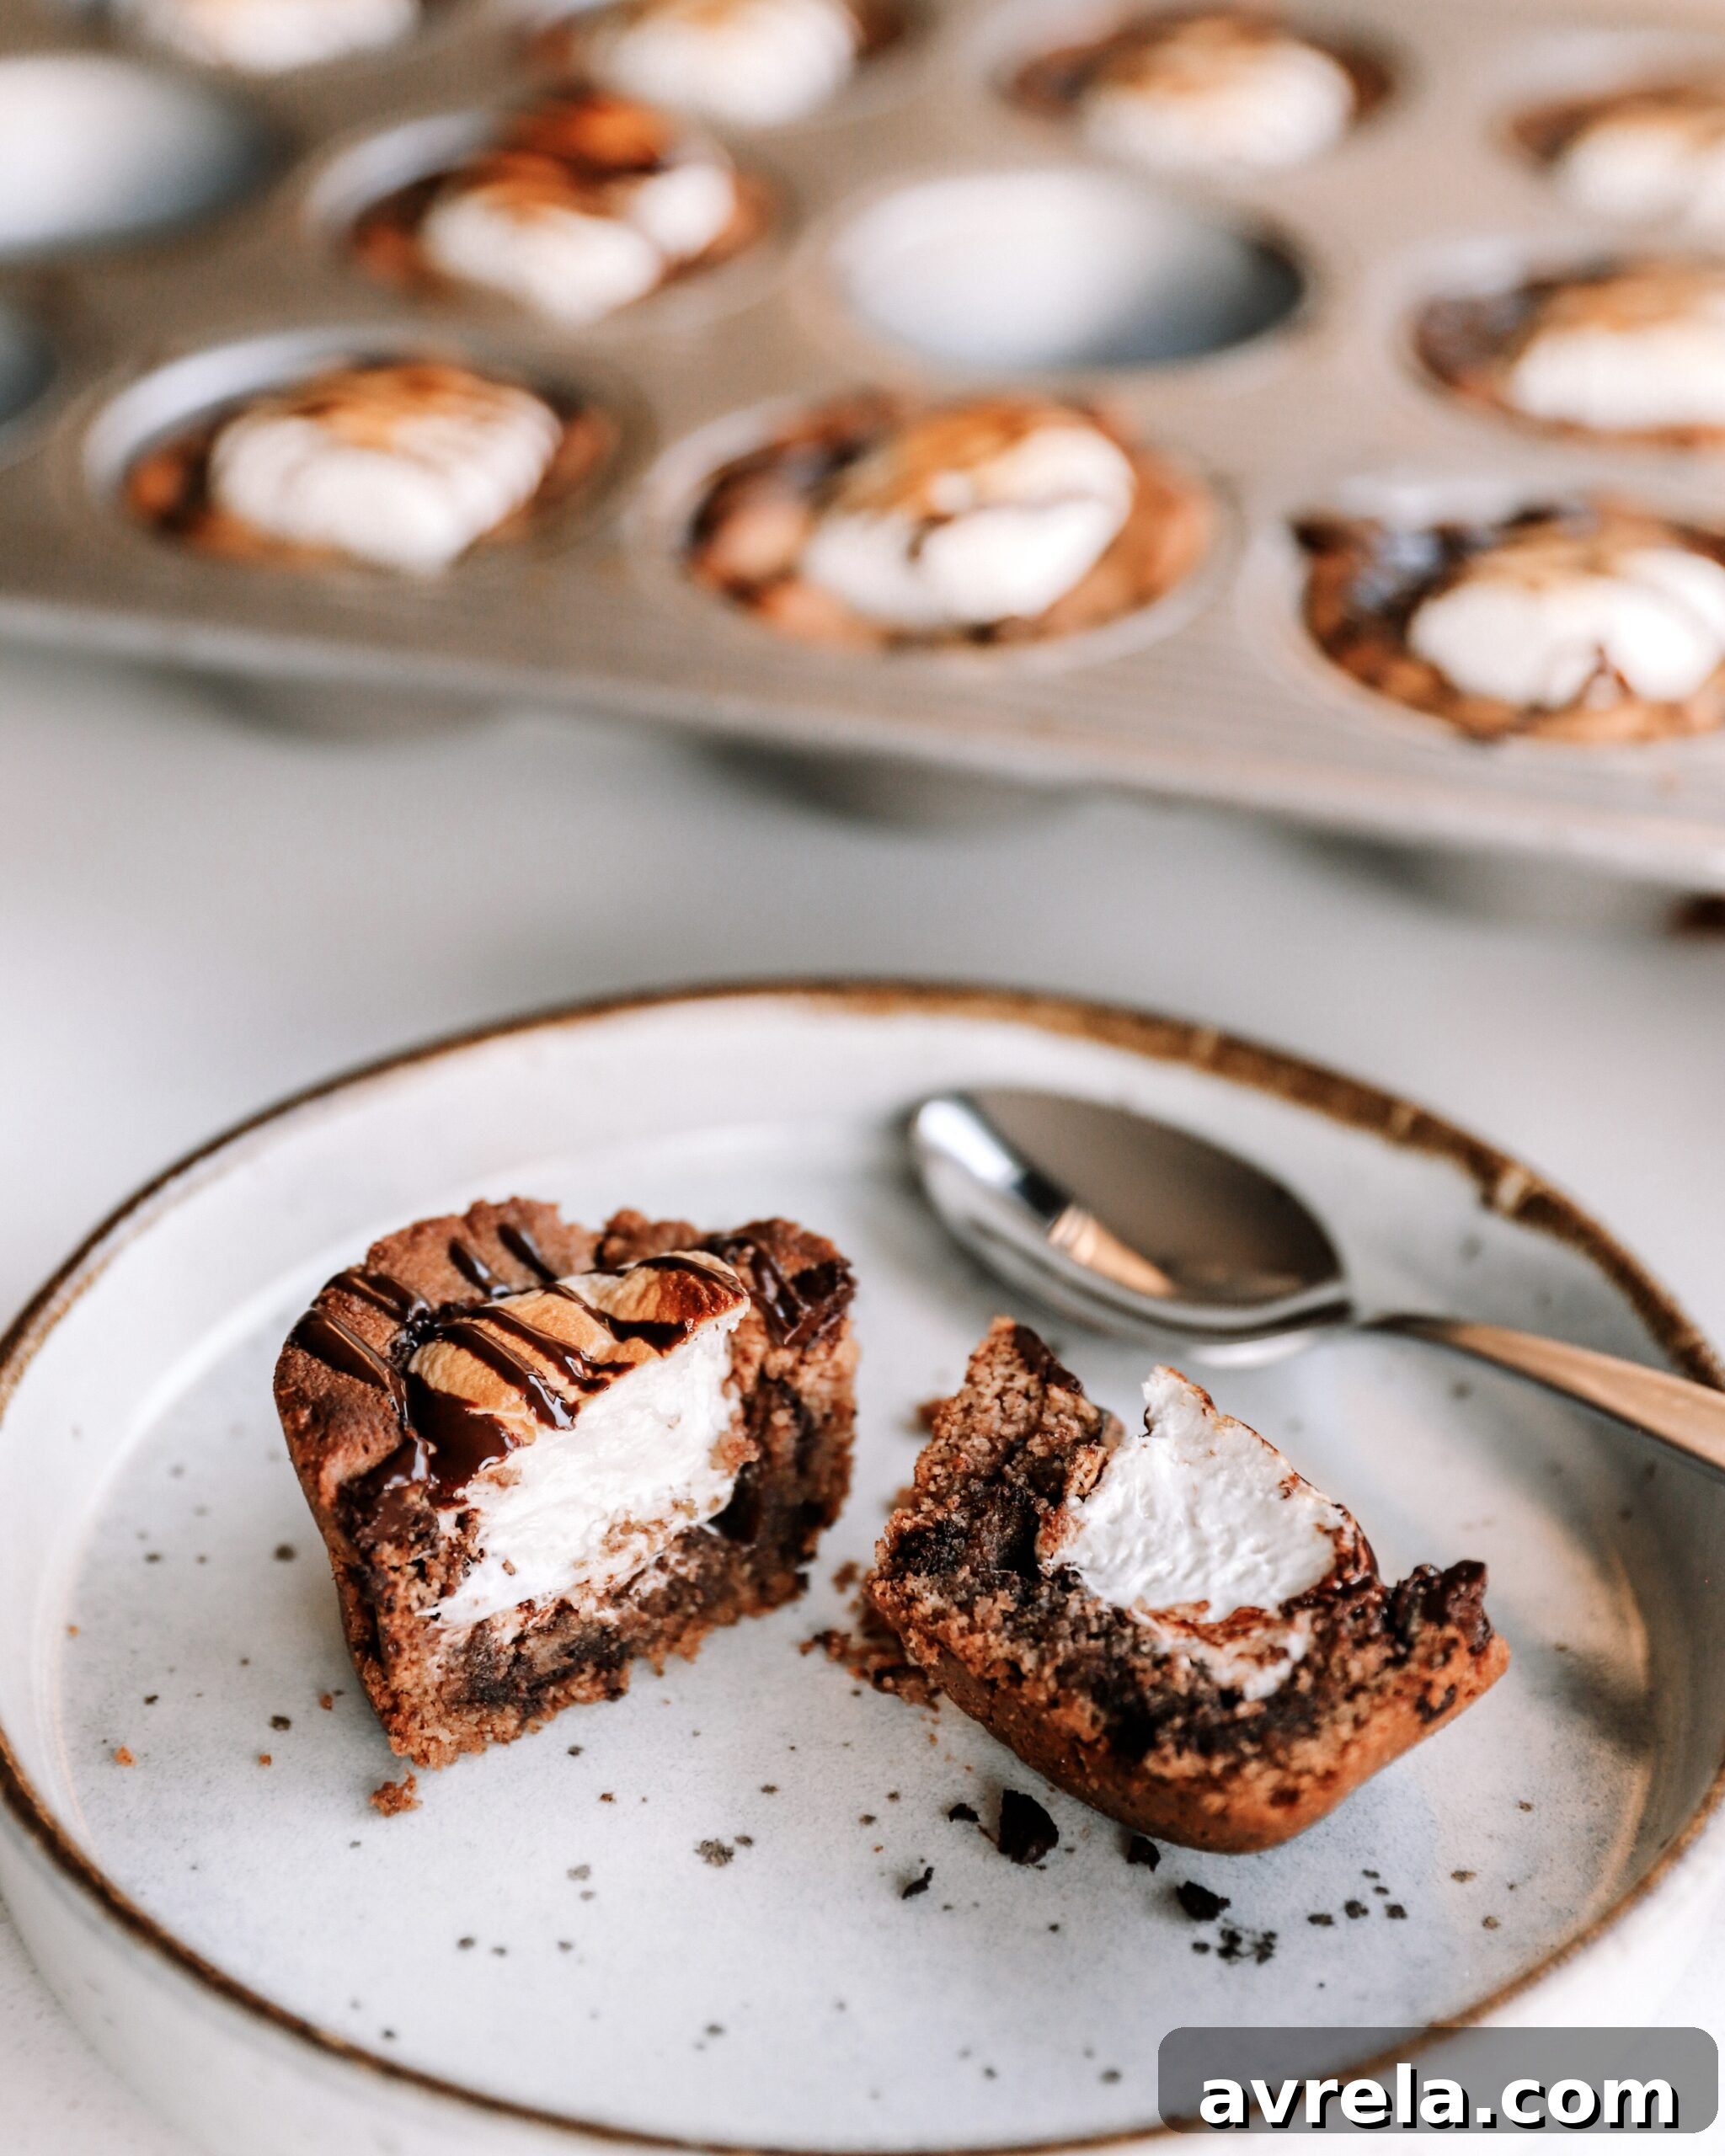
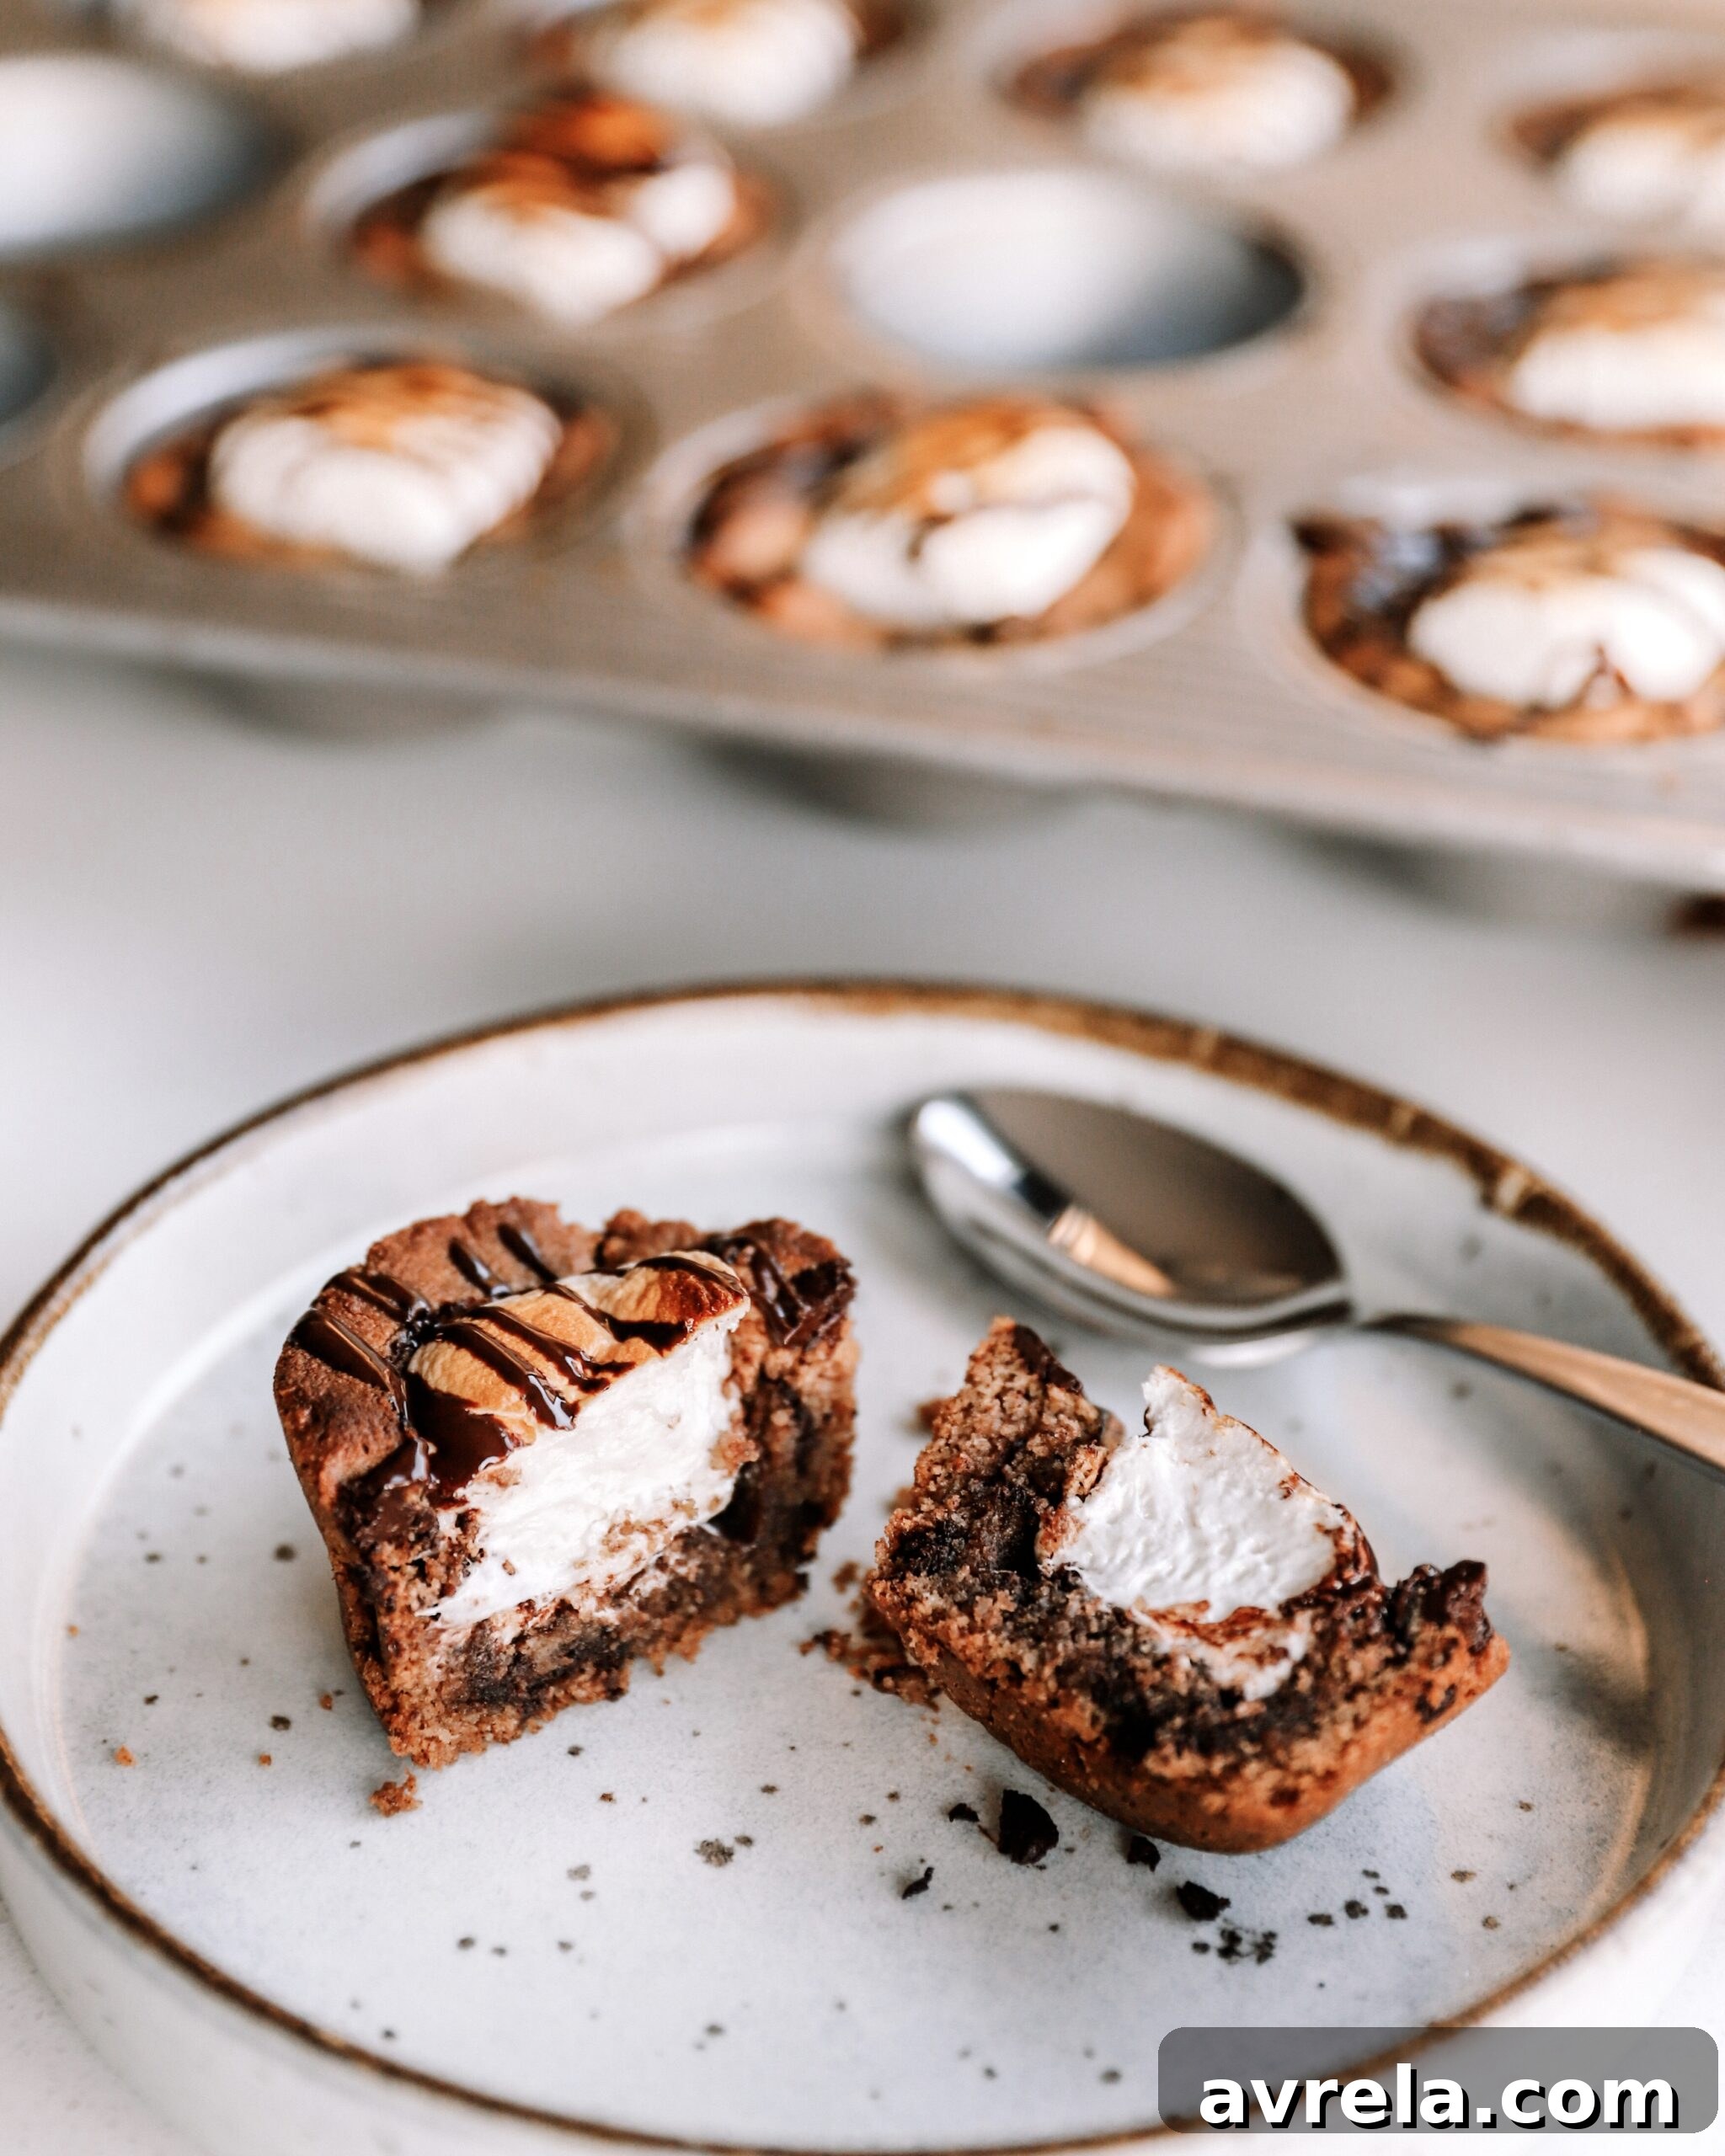
Escape to the warmth of a summer campfire any time of year with these irresistible S’mores Cookie Cups! Forget complicated baking – this recipe is designed to be effortlessly delicious, allowing you to whip up a batch of these gluten-free and dairy-free delights with minimal fuss. Imagine sinking your teeth into a perfectly baked cookie cup, crispy on the edges and wonderfully soft in the center, generously filled with gooey, melted marshmallow and rich, dark chocolate. It’s the ultimate blend of nostalgic s’mores flavors, reimagined into a convenient, single-serve dessert that’s truly a game-changer for anyone who loves wholesome treats. These S’mores Cookie Cups aren’t just a dessert; they’re an experience, promising to transport you back to carefree summer evenings with every blissful bite.
AN INDULGENT TREAT MADE WITH WHOLESOME INGREDIENTS
Creating delectable treats doesn’t mean compromising on quality or health. In fact, it’s an opportunity to elevate classic recipes with better-for-you ingredients. These S’mores Cookie Cups are a prime example, carefully crafted to be gluten-free, dairy-free, and refined-sugar-free, ensuring that every bite feels indulgent without any guilt. Our cookie base is naturally sweetened with pure maple syrup, a natural alternative that offers a rich, nuanced sweetness. For the iconic s’mores experience, we opt for organic marshmallows, ensuring a cleaner ingredient profile for that signature gooey texture. This commitment to wholesome ingredients means you can enjoy a dessert that not only tastes incredible but also aligns with a mindful eating lifestyle. It’s all the familiar comfort of a traditional s’more, refined for modern dietary needs.
To truly savor the magic of these cookie cups, we recommend allowing them to cool for just a few minutes after baking. This brief resting period ensures the marshmallow achieves that perfect, irresistibly soft and gooey consistency, while the cookie remains warm and the chocolate chips are beautifully melty. The combination of textures and temperatures creates a harmonious symphony of flavors that is simply divine. If you happen to have any leftovers – though we doubt you will! – these cookie cups can be stored at room temperature for up to 24 hours, or in the refrigerator for up to three days. For the best experience, a quick warm-up in the microwave or a few minutes in a toaster oven will bring back that fresh-baked warmth and meltiness, making them taste as good as new.
Turn on your JavaScript to view content
HOW TO MAKE GLUTEN-FREE COOKIE CUPS
The foundation of these incredible S’mores Cookie Cups is my widely celebrated Cashew Chocolate Chip Cookie Skillet recipe, which first captured hearts (and taste buds) back in 2017. This viral recipe revolutionized gluten-free and dairy-free baking, proving that wholesome ingredients could create deeply satisfying desserts. Its success lies in its remarkably flavorful and versatile dough, which has since inspired numerous delightful variations. You might recognize it from the seasonal Pumpkin Spice Cookie Skillet, the decadent S’mores Cookie Skillet, the rich Caramel Cookie Skillet, or even the charming Cookie Skillet Individuals. Each variation showcases the dough’s adaptability and consistent ability to deliver a delicious experience.
What makes this cookie dough so special for our S’mores Cookie Cups? It’s renowned for its bold, comforting flavor profile that appeals to everyone, whether they follow a specific diet or not. This versatility makes it incredibly easy to customize for any occasion or craving. For this recipe, we’ve harnessed its power to create convenient, single-serve cookie cups that perfectly encapsulate the joy of s’mores. The design of these cups ensures a delightful textural contrast: a satisfyingly crispy edge that gives way to a wonderfully soft and chewy middle. This creates the ideal “pocket” to cradle a fluffy marshmallow, which then toasts to golden perfection. For an extra touch of decadence, this soft center can also comfortably accommodate a scoop of your favorite dairy-free ice cream once cooled. While we love using dairy-free chocolate chips for a rich, melty experience, feel free to personalize your cookie cups with any mix-ins your heart desires.
WHAT FLOUR IS BEST FOR GLUTEN-FREE COOKIES?
When venturing into the world of gluten-free baking, choosing the right flour is paramount to achieving the desired texture and flavor. For these S’mores Cookie Cups, almond flour has proven to be an exceptional choice. Its fine texture and subtle, naturally sweet, and nutty flavor complement the rich chocolate and sweet marshmallow beautifully. Almond flour is celebrated for its ability to lend a superior moistness to baked goods, preventing cookies from becoming dry or crumbly – a common challenge in gluten-free recipes. It also contributes healthy fats, making these cookies not just delicious but also more satisfying.
While almond flour truly shines in this particular recipe, the world of gluten-free flours offers several other popular alternatives that bakers often explore. Oat flour, for instance, is known for its mild flavor and ability to add a tender chewiness, though it can sometimes absorb more liquid, requiring recipe adjustments. Paleo flour blends, typically a mix of nut flours and starches, are designed to mimic traditional flour but can vary widely in performance depending on their specific composition. Similarly, all-purpose gluten-free baking flour blends, often made from rice flour, potato starch, and tapioca starch, can be convenient but may sometimes result in a grittier texture or require additional binders. It’s important to note that I have specifically developed and tested this S’mores Cookie Cup recipe using almond flour, and therefore cannot guarantee the same results with other gluten-free flours without further experimentation and potential modifications to liquid ratios and baking times. However, for those keen on exploring, these alternatives present interesting possibilities for future baking adventures.
CAN YOU BAKE COOKIES IN A MUFFIN TRAY?
Absolutely! One of the delightful discoveries during the creation of these S’mores Cookie Cups was the incredible versatility of a humble muffin tin. While typically reserved for muffins, cupcakes, or savory egg bites, a muffin tin proves to be an ingenious tool for achieving beautifully shaped, individual cookie cakes. It’s a revelation that transforms ordinary cookie dough into something truly special. The muffin tin isn’t just a container; it’s a sculptor, creating the perfect cup-like depression that is essential for holding our melted marshmallow and chocolate. But beyond its utility for this recipe, baking cookies in a muffin tin yields a truly unique and desirable texture.
When baked in a muffin tin, cookies develop wonderfully crispy edges that contrast exquisitely with a thick, soft, and unbelievably gooey center. This structural integrity means each cookie is a perfectly portioned dessert, ideal for serving at parties, as a lunchbox treat, or simply for enjoying a single, satisfying indulgence. This method delivers a cookie experience that goes beyond flat, traditional shapes, offering an exciting new dimension to your baking repertoire. Seriously, once you experience the magic of muffin-tin cookies, you might just find yourself dreaming about that perfect crispy-gooey balance until your next batch! It’s an easy technique that elevates any cookie recipe, promising a delightful surprise with every bite.
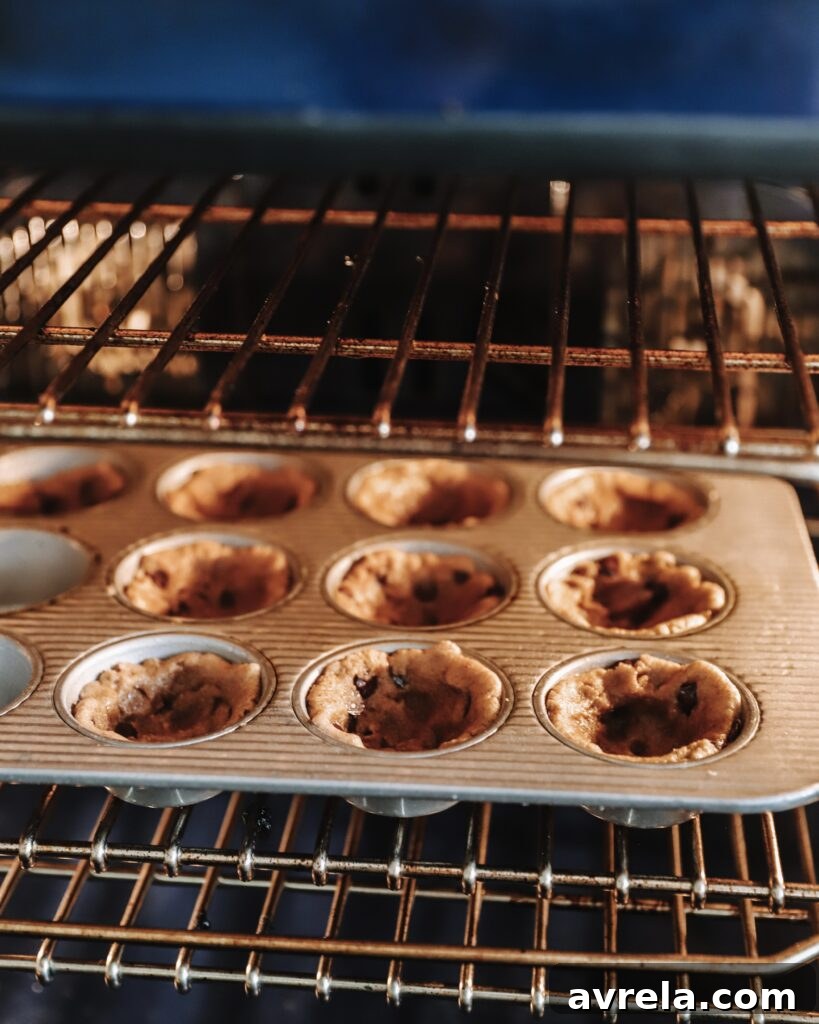
To prepare your muffin tin for these delightful cookie cups, first lightly grease each cup. I find coconut oil spray works exceptionally well, providing a non-stick surface and a hint of complementary flavor. Then, take approximately two generous tablespoons of your prepared cookie dough and press it firmly and evenly into the bottom of each muffin cup, working it slightly up the sides to form a sturdy cup shape. This creates the perfect vessel for your s’mores filling. Once the dough is in place, bake for 13-15 minutes until the edges are golden brown and the centers are just set. After removing the tin from the oven, resist the urge to immediately fill them. Allow the cookie cups to cool in the tin for about 5 minutes. This crucial resting period helps them firm up slightly. Once cooled, gently press the bottom of a shot glass or the back of a spoon into the center of each baked cookie cup, creating a deeper well. This indentation is precisely where your fluffy marshmallow will nestle, ready for its final toasting stage.
The beauty of this cookie dough lies in its sheer simplicity and the use of everyday pantry staples. You’ll likely find most of the ingredients already on hand, making these S’mores Cookie Cups a spontaneous treat to prepare. The process is straightforward: first, whisk together all the wet ingredients until they are beautifully combined and smooth. This liquid base forms the foundation for our flavorful cookie. Next, gently sift in the dry ingredients, ensuring an even distribution and preventing any lumps, which can affect the final texture of your cookies. Mix everything together until just combined; be careful not to overmix, as this can lead to tougher cookies. What truly sets this dough apart is its composition: it’s packed with “better-for-you” ingredients that contribute to its deliciousness while offering nutritional benefits. From wholesome almond flour to natural sweeteners, you can genuinely feel good about indulging in this delightful recipe.
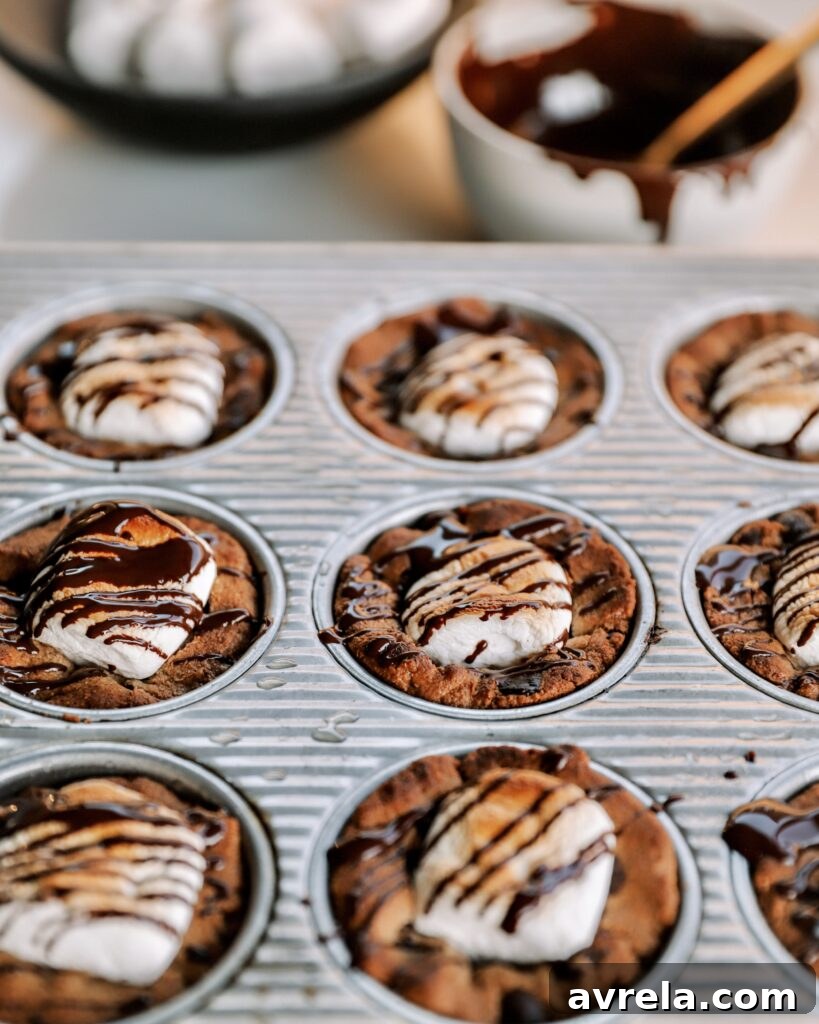
To finish these magnificent S’mores Cookie Cups with a flourish, a generous drizzle of melted chocolate is essential. There are a few tried-and-true methods to perfectly melt your chocolate, ensuring a smooth, glossy consistency for drizzling. One popular approach is melting chocolate on the stove in a small saucepan over very low heat, stirring constantly to prevent scorching. Alternatively, a double boiler method offers more control: simply place a heat-safe glass bowl over a small saucepan of simmering water, ensuring the bottom of the bowl does not touch the water. The steam will gently melt the chocolate, allowing for continuous stirring until it’s perfectly smooth. For a quick and easy option, melt the chocolate in a microwave-safe bowl, heating in short 30-second intervals and stirring thoroughly after each to prevent burning. Whichever method you choose, once your chocolate is beautifully melted, use a spoon to artistically drizzle it over the toasted marshmallow and cookie base of each cup. This final touch adds an extra layer of chocolatey goodness and visual appeal, making your S’mores Cookie Cups truly irresistible.
INGREDIENTS YOU’LL NEED:
- Egg or Flax Egg (for a vegan option)
- Maple Syrup
- Coconut Oil
- Cashew Butter, or your preferred nut/seed butter
- Vanilla Extract
- Almond Milk
- Almond Flour
- Baking Soda
- Cinnamon
- Chocolate Chips (dairy-free recommended)
- Flakey Sea Salt (such as Maldon)
- Marshmallows (organic, if preferred)
HOW TO MAKE S’MORES COOKIE CUPS
Get ready to create these utterly delicious S’mores Cookie Cups with this straightforward recipe. First, preheat your oven to 350 degrees F (175 degrees C). In a large mixing bowl, begin by thoroughly whisking together the wet ingredients: the egg (or flax egg), maple syrup, melted coconut oil, cashew butter, almond milk, and vanilla extract until smooth and well combined. Next, gradually stir in the dry ingredients: almond flour, baking soda, cinnamon, and a pinch of sea salt. Mix until the dough comes together, ensuring no clumps remain, then gently fold in the chocolate chips, distributing them evenly throughout the dough.
Prepare a standard cupcake or muffin tin by lightly spraying each cup with oil. Take approximately two generous tablespoons of the cookie dough and press it firmly into the bottom of each cup, working it up the sides to form a sturdy cup shape. This recipe typically yields about 9-11 cookie cups. Bake in the preheated oven for 15 minutes, or until the edges are golden. Remove the tin from the oven and let the cookie cups cool for 5 minutes on the counter.
After cooling, use the bottom of a shot glass or the back of a spoon to gently press down the center of each cookie, creating a perfect indentation. Carefully place a marshmallow into the center of each pressed cookie cup. Return the muffin tin to the oven and bake again at 350 degrees F for just 2-3 minutes, allowing the marshmallows to soften. For that iconic golden, toasted marshmallow topping, switch your oven to the broil setting and bake for an additional 1-2 minutes. Watch them very carefully during this stage, as marshmallows can burn quickly! Once they reach a beautiful golden brown, remove from the oven and, while still warm, drizzle additional melted chocolate over the top of each S’mores Cookie Cup. Serve warm and enjoy!
RECIPE SUBSTITUTIONS & QUESTIONS
This recipe is wonderfully adaptable to various dietary needs and preferences. If you’re looking for a vegan option or simply prefer to avoid eggs, feel free to substitute a flax egg for the pasture-raised egg. To make a flax egg, simply combine 1 tablespoon of ground flaxseed meal with 3 tablespoons of water, stir well, and let it sit for 5 minutes until it thickens into a gelatinous consistency. This works as an excellent binder in most baking recipes. Similarly, the cashew butter is easily interchangeable with other nut or seed butters. Peanut butter, almond butter, or sunflower seed butter are all fantastic alternatives that will lend their unique flavor profiles to the cookie cups. Keep in mind that different nut butters can slightly alter the final taste, so choose one you love! As for the flour, I have specifically tested and developed this recipe using almond flour due to its superior texture and moisture contribution. While other gluten-free flours exist, I have not personally tested them with this particular recipe, so results may vary if you choose to experiment.
LOVE THESE S’MORES COOKIE CUPS? HERE’S MORE SWEETS YOU’LL LOVE:
If you’re a fan of wholesome, gluten-free, and dairy-free desserts, you’ll definitely want to explore these other fantastic recipes from my kitchen:
Gluten-Free Peanut Butter Cookies – A classic, made healthier.
Chocolate Tahini Cookie Skillet – An exotic and rich twist on a favorite.
Gluten-Free Chocolate Chip Cloud Cookies – Light, airy, and utterly delicious.
Pumpkin Spice Cookie Skillet – Perfect for fall flavors.
S’mores Cookie Skillet – The original skillet version of this beloved treat.
Caramel Cookie Skillet – Sweet, gooey, and irresistibly caramel-infused.
Cookie Skillet Individuals – Perfectly portioned cookies for convenience.
Click here for the Reel I made of this recipe, showing you how it all comes together!
S’mores Cookie Cups
Ingredients Needed
For the Gluten-Free Cookie Dough
- 1 pasture-raised egg, (or flax egg for vegan option)
- 3 tbsp pure maple syrup
- 1/4 cup melted coconut oil
- 1/3 cup cashew butter, (or preferred nut/seed butter)
- 1 tsp vanilla extract
- 1 tbsp unsweetened almond milk
- 1.5 cups almond flour
- 1/4 tsp baking soda
- 1/2 tsp ground cinnamon
- 3/4 cup dairy-free chocolate chips, (I prefer Evolved Chocolate signature dark)
- 1/4-1/2 tsp flakey sea salt (Maldon)
For the S’mores Topping
- 9-11 marshmallows, (depending on muffin tin size)
- 1/4 cup chocolate chips, melted for drizzling
Step-by-Step Instructions
Cookie Cup Preparation
-
Preheat your oven to 350 degrees F (175°C).
-
In a medium-sized bowl, thoroughly whisk together all the wet ingredients: egg (or flax egg), maple syrup, melted coconut oil, cashew butter, almond milk, and vanilla extract until smooth.
-
Gradually stir in the dry ingredients: almond flour, baking soda, ground cinnamon, and sea salt. Mix until just combined, ensuring any clumps are pressed out. Then, gently fold in the chocolate chips until evenly distributed.
-
Lightly oil a standard 12-cup muffin tin. Take approximately 2 tablespoons of cookie dough for each cup and firmly press it into the bottom and up the sides to form a small cup. This recipe should yield 9-11 cookie cups.
-
Bake for 15 minutes, or until the edges are golden. Remove the muffin tin from the oven and let the cookie cups rest on the counter for 5 minutes to slightly firm up.
-
Using the bottom of a shot glass or the back of a spoon, gently press down into the center of each cookie cup to create an indentation. Place one marshmallow into the hole of each cup.
-
Return the muffin tin to the oven and bake at 350 degrees F for another 2-3 minutes to soften the marshmallows. Then, turn your oven to the broil setting (high) and broil for approximately 1-3 minutes, watching constantly, until the tops of the marshmallows are beautifully golden brown. Be very careful not to burn them!
-
Remove the S’mores Cookie Cups from the oven. While still warm, drizzle the remaining melted chocolate generously over the top of each cup. Serve immediately and enjoy the warm, gooey goodness!